Add/Modify Workbook Set (one-side mode)
This dialog window is for adding a new Workbook Set for Workbook Validation and for modifying a previously created one.
The dialog window for adding and for modifying has the same UI, only the dialog caption differs and Environment Selector is available when adding a new set only.
There are UI differences for workbook sets in two-sides and one-side modes. This topic is for one-side mode.
This dialog window includes the following tabs:
General Tab
In this tab you select workbooks for your set and give it a name.
It includes the following properties:
| Name | Type | Example | Description |
|---|---|---|---|
| Name | String | New Workbook Set | The display name of the workbook set. Required. |
| Description | Text | My descriptive text | Optional text comment. |
| Environment Selector | List box | TB003 | Choose an environment in the selector. Available for adding a workbook set, disabled when modifying it. |
The selected workbooks are displayed in the tree-table format.
Right-click any row to open a context menu with the single item Properties....
For the workbooks in the Tree Views the following columns are shown:
| Column | Description |
|---|---|
| Name | Title and hierarchy position of the workbook. |
| ID/Status | For the left target, the ID of the workbook. For the right target, the status of this workbook. |
The button Choose Workbooks at the bottom opens the Choose Workbooks dialog window. In this dialog window you can select workbooks for this workbook set.
Schedule Tab
In this tab you set up the schedule for regular execution of workbook validation configured on the General tab.
It contains the description of the currently configured schedule and the Modify Schedule button. Upon click, the Workbook Set Schedule dialog window opens:
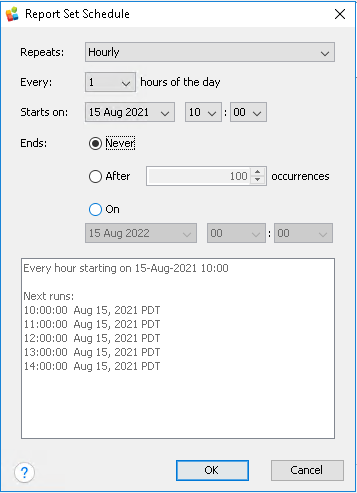
It is similar to the Alert Schedule dialog window and has the following fields:
| Field | Type | Example | Description |
|---|---|---|---|
| Repeats | Enum | Hourly | Choose a time measurement unit |
| Every | Integer | 3 | Specify a number of time measurement units to wait between executions. Hourly 3 means "run it every 3 hours". |
| Starts on | Timestamp | 23 Aug 2021 12:00 | Specify date and time when this validation should run for the first time. The timestamp will be saved with a timezone set on your MMTE Server system. |
| Ends | Enum | Never | Choose: Never for continuous usage After X occurrences On <timestamp> for limited usage |
Check in the text area below the resulting data: overall description of the schedule and next five runs. Then click OK to close the Modify Schedule dialog.
Set the Scheduling enabled checkbox for automatic execution of this Workbook Set validation. Unset it if you want to run this validation manually only.
Notifications Tab
In this tab you configure email and/or SMS notification should you have a discrepancy in your Tableau workbooks.
It includes the following properties:
| Name | Type | Example | Description |
|---|---|---|---|
| Message | Text | 2 side validation | This text will be sent inside the email and/or SMS notifications in the line titled Message: |
| Notify on changes? | Checkbox | If checked, email notification(s) will be sent | |
| To | Text | name@company.com; john@mail.com | Specify one or more recipients (email addresses). Use comma or semicolon as separators. |
| Cc | Text | name@company.com; john@mail.com | Specify one or more email addresses to send a carbon copy. Use comma or semicolon as separators. |
| Bcc | Text | name@company.com; john@mail.com | Specify one or more email addresses to send a blind carbon copy. Use comma or semicolon as separators. |
| Attach comparison result as PDF | Checkbox | Set this checkbox to send the comparison results with each email message. comparepdfcmd is required for this option. If comparepdfcmd is not installed, the PDF will not be sent. |
|
| Enabled? | Checkbox | If checked, SMS notification(s) will be sent. | |
| Phone(s) | Text | +123456789; +1098765432 | Specify one or more phone numbers (MSISDN format). Use semicolon, spaces, or comma as separators. |
Advanced Tab
In this tab you configure additional parameters of the workbook validation process.
It includes the following properties:
| Name | Type | Example | Description |
|---|---|---|---|
| Generate PDF | Checkbox | Enable workbook validation via conversion to the PDF format | |
| Generate XML | Checkbox | Enable workbook validation via conversion to the XML format | |
| Stop comparing two PDF files after following number of differences | Checkbox | Set this checkbox if you want to set a limit of differences after which the PDF comparison process will stop. If set, the next field becomes editable. | |
| Maximum number of differences hint | Integer | 1 | Specify a limit for difference detection. If you use the Attach comparison result as PDF feature (see above), you may want to leave this setting unlimited to see all found differences in the attached file. Or specify more or less high value to avoid unneeded calculations when workbooks are completely different. If you do not use the Attach comparison result as PDF, it makes sense to set this limit to 1. It is enough to assume that workbooks are different and to speed up the comparison process. |
Click OK to save a new Workbook Set or click Run Now to save and run validation immediately.