MetaMiner Standard Universe
Install the MetaMiner Standard Universe in a BusinessObjects environment so that report developers can build their own Web Intelligence analytics on the metadata in the MetaMiner Database (MMDB).
The universe sits on top of the MMDB and exposes, among other things:
- users and groups
- folders
- security (explicit and effective rights)
- Web Intelligence, Analysis for Office, OLAP and universe (UNV, UNX) dictionaries
- instances and scheduling
Before you begin
- The universe is delivered as a Promotion Management file on the MetaMiner Server:
<install folder>\server\support\MetaMiner Standard Universe_16_MAY_2021-LATEST.lcmbiar. - You need CMC access with rights to import with Promotion Management, or someone who has it.
- You need a PostgreSQL login for the universe connection. Use a read-only login, as described in Direct MMDB Access.
- The MMDB host must accept connections from the BusinessObjects hosts on the MMDB port (
49614for the embedded PostgreSQL). See Network Ports and Firewall.
TODO: confirm the current universe file and supported BusinessObjects versions
The shipped file is dated 16 May 2021. Confirm it is still the current release and that it imports into BI 4.3 and BI 2025.
Install the PostgreSQL ODBC driver
The universe connection uses the PostgreSQL ODBC driver. Which driver bitness you need depends on where the universe is used:
| Scenario | What to install |
|---|---|
| Universe Design Tool on a workstation | PostgreSQL ODBC driver, 32-bit |
| Universe Design Tool and Information Design Tool on a workstation | First the 32-bit driver, then the 64-bit driver |
| Universe used in a BusinessObjects environment | 64-bit driver on every host that runs a Web Intelligence Processing Server |
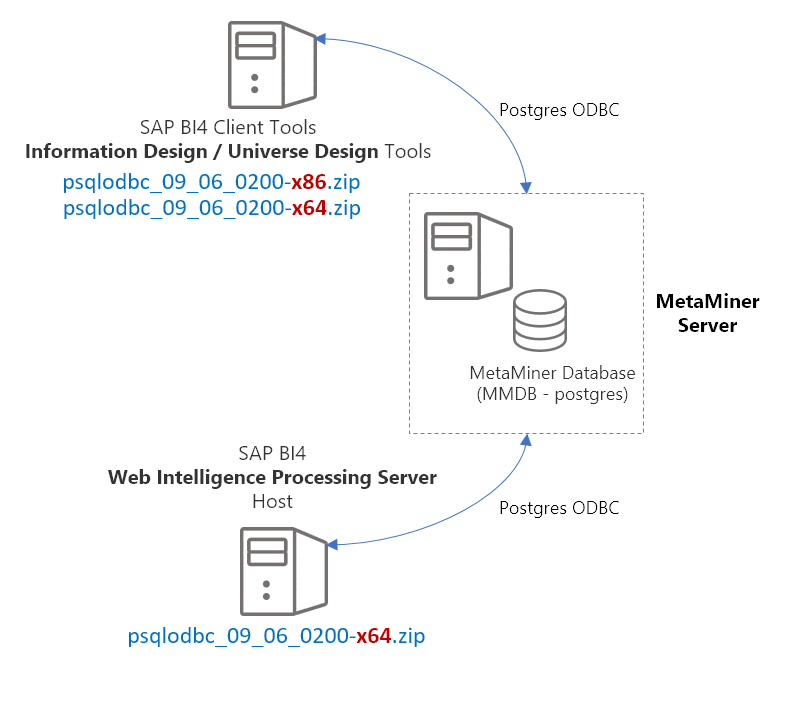
Install the driver on every Web Intelligence Processing Server host
If you have several Web Intelligence Processing Server hosts, install the 64-bit driver on each one. Otherwise BusinessObjects load balancing sends some refreshes to a host without the driver, and reports on the MetaMiner Standard Universe fail.
Video walk-through of the ODBC setup:
-
On the MetaMiner Server, open
<install folder>\server\pgsql. It contains the driver installerpsqlodbc-setup_10_03_0000.exe.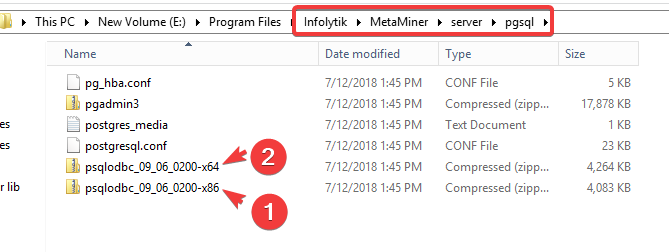
-
Copy the installer to each machine that needs the driver and run it. Install the 32-bit and/or 64-bit driver according to the table above.
- Open the ODBC Data Source Administrator of the right bitness:
- 64-bit:
%WINDIR%\System32\odbcad32.exe - 32-bit:
%WINDIR%\SysWOW64\odbcad32.exe
- 64-bit:
-
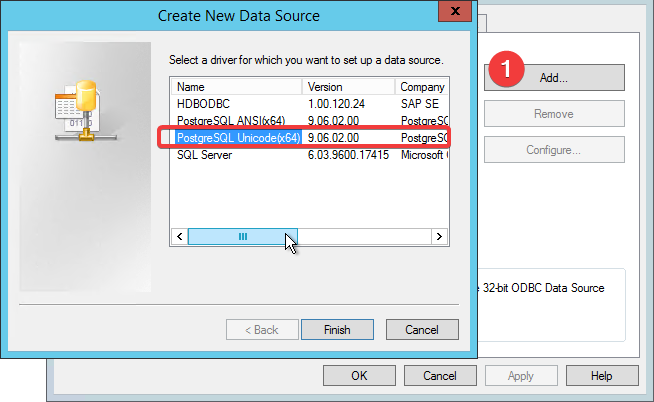
On the System DSN tab, click Add and choose PostgreSQL Unicode.
-
Fill in the data source:
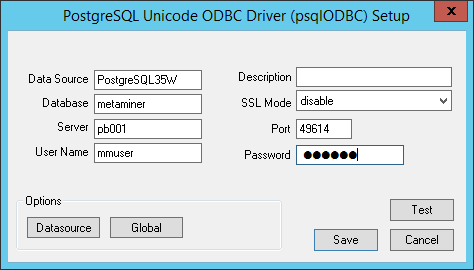
Setting Value Data Source PostgreSQL35WDatabase metaminerServer <metaminer-server>User Name your read-only login Password <password>Port 49614(embedded PostgreSQL) -
Click Datasource and clear these check boxes:
- Text as LongVarChar
- Unknowns as LongVarChar
- Bools as Char
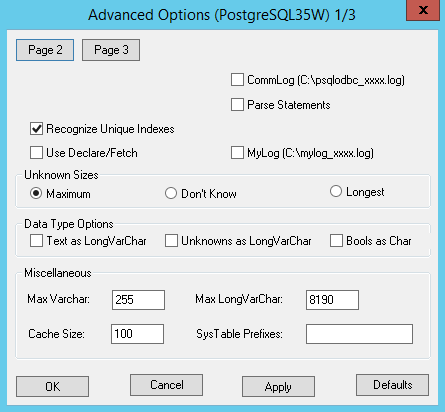
-
Click Test, then Save.
Use a newer driver if the connection test fails
The driver shipped with MetaMiner is psqlODBC 10.03. If it cannot connect to your PostgreSQL version, install a current psqlODBC release from postgresql.org.
Import the universe
Video walk-through of the universe installation:
- Log on to the CMC.
- Open Promotion Management.
- Import the
MetaMiner Standard UniverseLCMBIAR file. - Promote it to your BusinessObjects environment.
- Start the Universe Design Tool on a workstation that has the 32-bit driver and data source.
- Import the
MetaMiner Standard Universefrom theInfolytikuniverse folder. - Edit the
metaminer-postgresconnection so it uses your data source and read-only login, and test it.
Verify
- The
metaminer-postgresconnection test succeeds in the Universe Design Tool. - A new Web Intelligence document on the universe refreshes in BI launch pad (this proves the 64-bit driver on the processing servers).