Report Validation
Introduction
MetaMiner's Report Validation feature allows users to:
- Validate reports integrity over time.
- Compare individual reports or whole sets of reports from same or different environments.
- Validate migration of large report sets from one environment to another.
Report Validation currently works with Web Intelligence reports only.
To enable Report Validation feature please contact Infolytik support.
Overview
The Report Validation feature is represented by its own tab within MetaMiner Client.
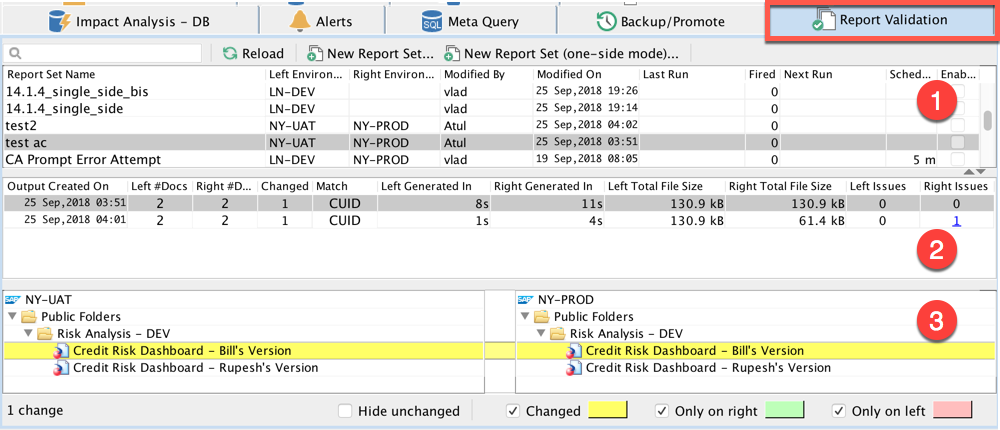
The Report Validation tab consists of 3 panels:
- Reports sets table.
- Reports set outputs table - shows outputs for the selected report set.
- Reports compare pane - highlights differences between left/right report trees for selected report set output. Provides actions to view/compare actual reports output content as PDF.
You could create/edit report set by adding/removing reports to it at any time.
Report set could be one-sided with reports only from one environment or two-sided with reports from two distinct environments.
Report set produces multiple report set outputs as it could be scheduled to run multiple times or/and could be run on demand.
Reports in the report set may have prompts which may require mandatory answers. When report set is created/edited the MetaMiner server retrieves prompts from BI server with possible answers and current values, and lets the user to enter/edit prompt answers. Prompt answers for any report in the report set could be edited at any time.
Every time when report set schedule is fired the new report set output is created and for each report the corresponding PDF file is generated using current prompt answers. These PDFs are saved to the MetaMiner Server disk together with the diff data (difference with previous output in case of single-sided set or difference with another side in case of two-sided set).
Creating One-Sided Report Set
Click New Report Set (one-side mode)... button on the toolbar to bring up Add New Report Set dialog which has 4 tabs.
- In `General` tab enter: * `Name` of the report set * `Description` (optionally) * Choose the CMS Environment from the drop-down list * Click `Choose Reports` - the report chooser with left and right panels will appear. Move reports you want to include into report set from left to right panel and click OK. Before going to other tabs we recommend to save your report set, select newly added set, invoke right-click action `Run Now` and make sure that the results are generated without any major issues. You could also tick `Run only if query pass` if you want to specify an additional limitation on when to run scheduled report set. See [Using SQL Query](#SQL) for more info.
- Select saved report set, right-click and choose `Modify`. In the `Schedule` tab, enter scheduling parameters: how often you want to run report set and when the schedule should stop. Then click OK and at the bottom of the main dialog tick `Scheduling enabled`. See [Modifying Report Set Schedule](#schedule) for more info.
- If you want to receive notifications via email or/and SMS in case if: * report output difference is found (with previous output in one-sided case or with a matching report in two-sided case) * report set job is failed as a whole * particular report output is failed then in `Notifications` tab enter: * Specific `Message` for this report set (optional) * In `Email Notifications` section tick `Notify on changes?` and enter emails separated by a semicolon or comma, then tick `Attach comparison result as PDF`. Save report set, edit externally one of the reports, then select saved report set, right-click and choose `Run Now`. Check if you received your email notifications. * In `SMS Notifications` section tick `Enabled` and enter phone numbers in international format separated by a semicolon if you wish to receive notifications on your phone(s).
- Some reports may have auto-generated date/time string at the top or at the bottom of the report and this could cause false-positive results of the report comparison when the rest of the content is identical. If you want to exclude top or bottom parts of your reports from comparison then in `Margins` tab you could enter `Exclude header` or/and `Exclude footer` accordingly as a percentage of report height.
Once you will have few report set outputs generated you may choose several right-click actions on Reports set outputs table to View/Compare PDF Outputs, etc:
View Reports- you could also double-click on the row to invoke this actionMark for CompareCompare with Marked- enabled only if you usedMark for ComparebeforeCompare with Previous Output- enabled only for outputs which actually have a difference with the previous oneDelete
Creating Two-Sided Report Set
Creating two-sided report set is similar to creating one-sided which is described above but with these notable changes:
- The toolbar button is called
New Report Set... - Two-sided report set works with reports from two distinct environments and has selectors for left and right CMS, left and right reports.
- You could choose reports on both sides manually or you could choose reports on one side and then automatically populate the other side using
Match Other Sidebutton. You could combine this with an option to auto-copy prompt answers when you are sure that each report on the left and on the right side have the same set of prompts. - If you want to set an additional limitation on when to run scheduled report set you could specify SQL query for one of the sides or for both sides. See Using SQL Query
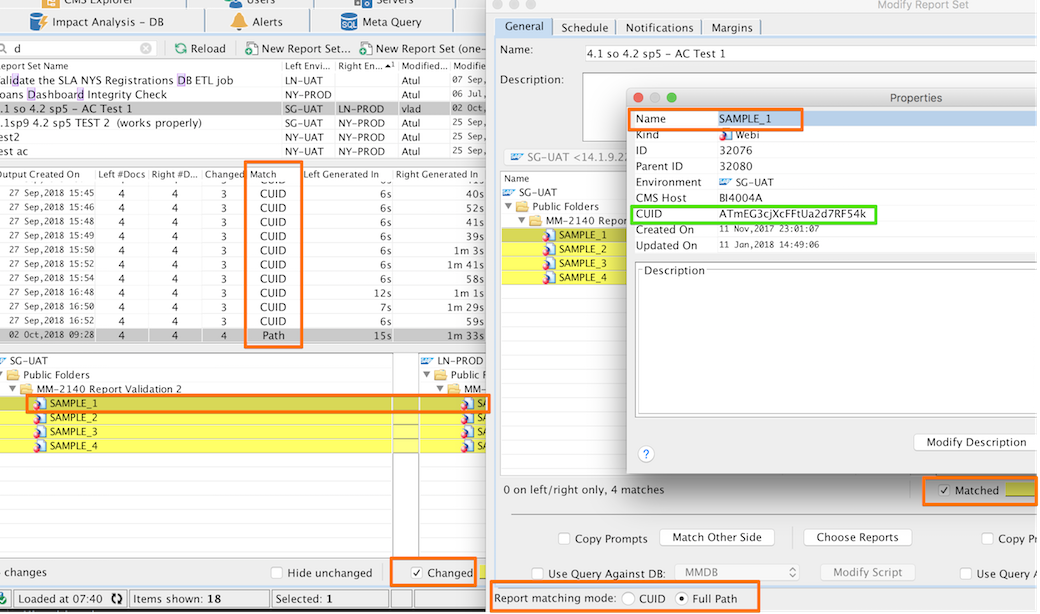
- You could choose the matching mode by clicking on
CUIDorFull Pathradio buttons. - After you have created the report set and it generated some outputs you could select one of the outputs and review the differences between left/right report trees in reports compare pane.
Which matching mode should I choose?
CUID- choose to match reports by CUID (Cluster Unique Identifier). For example, report could be exported to another environment and then renamed, but it could be still matched.Full Path- choose to match reports by name and full folder path. For example, 2 reports in 2 environments could be created in different ways and have different CUIDs but have same name/path.
Note that the matching mode could be changed anytime via Modify Report Set dialog.
The matching mode is effectively used:
- when report set is created or edited and
Match Other Sidebutton clicked - the reports on other side are populated based on the matching mode and matches are highlighted with yellow color. - when report set is run on MetaMiner server the reports on the left side are compared one by one with matching reports and the difference info is generated.
- in reports set outputs table in
Matchcolumn to indicate which matching mode was used for each report output. - in reports compare pane at the bottom part of the tab. If reports are matched and differences are found then such reports are highlighted with yellow color.
Viewing/Comparing PDF Outputs
 The differences areas are indicated by red background and also by a red marker on the left or right margin stripe.
First 4 toolbar buttons help to jump to the first, previous, next and the last page respectfully.
Zoom control allows you to zoom the PDF in and out. Please note that zooming in too much may require more memory allocated for the MetaMiner client.
There are 2 display modes to view the differences: text mode and image mode.
The text mode is more useful to find changes in plain text and the image mode is more useful for changes in graphs/charts.
To activate the text mode uncheck the Image mode checkbox.
The buttons with blue up and down arrow on the toolbar help to highlight the next/previous difference on the current page with a blue border around the difference area and with a blue marker on the left or right margin stripe.
At the bottom of the dialog, you could see the page chooser. The blue border around page number indicates that the page is currently selected. The yellow background indicates that at least one difference is found on the page, the red background indicates that page on the left of on the right is missing.
Modifying The Report Set Schedule
You could edit the report set schedule anytime by going to Modify Report Set dialog and clicking Modify Schedule button in Schedule tab.
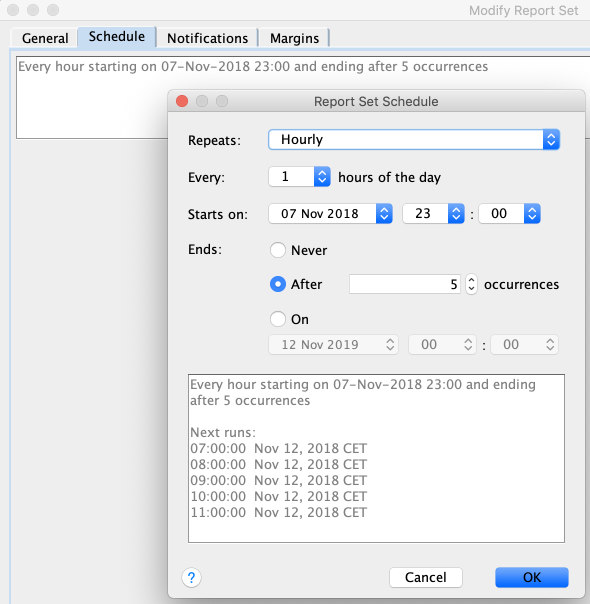
First, choose Repeats value from these options:
MinutesHourlyDailyEvery weekday (Monday to Friday)WeeklyMonthly
The first three options also have related Every field. For example, if you choose Hourly and put 2 in Every this would mean every 2 hours.
Then choose the date and time when scheduling should start with Starts on calendar and time chooser.
You could also choose when scheduling should stop:
- Never
- After a number of occurrences
- On a particular date and time
It is recommended to limit the number of occurrences to few runs during initial testing and then change this value after you are sure that everything in report set is setup correctly and output are generated as expected.
At the bottom of the dialog, you could see the preview indicating the dates and times for next runs if the modified schedule would be applied.
Up to 5 runs are displayed in the preview but the actual number of future runs could be much higher and even infinite if you choose Never value in Ends field.
Using SQL Query
Sometimes it is a good idea to specify an additional limitation on when to run scheduled report set. For example, you may want to limit only to the situations when you could detect with a query if something is actually changed. To do so:
- tick
Run only if query passin theGeneraltab ofNew/Edit Report Setdialog - click
Modify Queryand enter your query. You could press CTRL+Space in the editor to insert predefined tokens. - choose if you want to run the query against MMDB or CMS Audit DB. Use the MMDB in most cases unless you want to query the data which may not be present in MMDB (i.e. event details, number of rows in data provider, etc).
If Run only if query pass checkbox is enabled then report set would be executed only if the SQL query against the DB will return 1 or more rows during the scheduled check.
In the case of two-sided report you could specify this query on each side then the report set would be run only if both queries return at least 1 row.
In the query you could use the following tokens:
- $ENV_SERVER$ - CMS hostname for the CMS Environment (left or right side)
- $LAST_TIME_REPORT_SET_PROCESSED$ - a timestamp for the moment when scheduled report set was run last time
- $LAST_TIME_REPORT_SET_FIRED$ - a timestamp for the moment when scheduled report set output was generated
- $REPORT_UIDS$ - comma-separated list of CUIDs for reports in the report set
For two-sided report set you could also use:
- $LEFT_SIDE_ENV_SERVER$ - CMS hostname for the CMS Environment on the left side
- $LEFT_SIDE_REPORT_UIDS$ - comma-separated list of CUIDs of reports on the left side of the report set.
Here are some examples:
Against the MMDB:
SELECT *
FROM documents d
WHERE d.cmsid = $LEFT_SIDE_ENV_SERVER$
  AND d.cuid IN ($LEFT_SIDE_REPORT_UIDS$)
  AND d.updated >= $LAST_TIME_REPORT_SET_FIRED$
LIMIT 1
SELECT TOP 100 aed.*
FROM ADS_EVENT ae
INNER JOIN ADS_EVENT_DETAIL aed ON aed.EVENT_ID = ae.EVENT_ID
WHERE aed.EVENT_DETAIL_TYPE_ID = 1
  AND aed.EVENT_DETAIL_VALUE LIKE '%Error: ERR_WIS%'
  AND ae.Start_Time > $LAST_TIME_REPORT_SET_FIRED$
Video: Singe-sided Report Set
Coming soon
Video: Report Set with SQL query run condition.
Coming soon
Administration
Admin could move/export "Report Validation" archive folder which is found here:
\Program Files\Infolytik\MetaMiner\server\validation
When applying major MetaMiner software upgrade make sure to back up this folder.
By default, the email attachment size limit is set to 10MB. Admin could change this limit by setting another value to email.attachment.size.limit.mb property in MetaMinerServer.properties file.